Thank you to Sarah Stearns for this easy tutorial for beginners. Below are Sarah’s essential tips and tricks for making all sorts of tie dye designs, including that perfect rainbow spiral, right at home.
 Before you start dying, gather some supplies and materials. First and foremost, you’ll need the dye itself and some fabric to dye. Then, you’ll need to grab some tools and safety materials.
Here’s what you’ll need for this project.
- fiber-reactive dye (like these) in assorted colors
- your shirt or any fabric item like socks or sweatshirts
- rubber bands or strong string
- buckets (to dip items in dye)
- squeeze bottles (to apply dye)
- plastic tablecloths or large trash bags to protect your work surface
- wire rack to elevate the garment off the work surface, optional
- gloves and a mask
- zip-top bags or plastic wrap
Or, you can check out our list of recommended tie dye kits, which have everything you need to get started.
 How to Tie Dye: 6 Basic Steps
Tie-dye is a fun and safe project that kids and adults can enjoy together. But, before we get started, let’s go over a few safety tips.
- Work outside or on a protected work surface.
- Be sure to wear old clothes or an apron.
- Wear gloves so the dye won’t stain your hands.
- Wear a dust mask when mixing soda ash or dye powders.
Alright, let’s learn how to tie-dye!
Step 1. Prep the materials
Before you tie dye, you need to prewash the garments to remove any oils, dirt, or anything else that might be on your garment. These things can resist the dye, leading to dull or spotty results.
Next, set up your work area. If you will dying inside, protect your table with a plastic tablecloth or large trash bags. It’s a good idea to keep some paper towels or rags nearby to clean up any spills.
Then, gather your other tools, including plastic buckets, rubber bands, string, squeeze bottles, wire rack, and gloves.
 Step 2. Mix your dyes. Pre-soak your garment, if necessary.
Step 3. Fold and tie your garment.
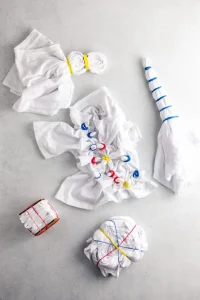
There are so many ways to fold and tie your fabric. Tie-dye techniques patterns range from simple to intricate. You can scrunch your garment, secure it with rubber bands, fold your garment, clamp it together, or even stitch a design into your garment with a needle and thread. (Keep reading for 10 ways to tie your garment for tie dye below!)
Step 4. Apply the dye.
There are many ways to apply the dye to the fabric. You can dip the garment into buckets of dye. Or, you can apply the dye directly to the fabric with squeeze bottles, paintbrushes, or sponges. You can use as many or as few colors as you want.
You can adjust the intensity of the colors by changing the dye-to-water ratio. If you want more pastel colors, you can add more water to the dye mixture.
When applying the dye, consider color placement. Think back to art class and the concept of the color wheel. Colors placed next to each other will bleed together at the border, creating new colors. Red placed next to yellow will create orange, green placed next to blue will create teal.
If you place complementary colors next to each other (that’s red-green, orange-blue, or yellow-purple), you may create brown or other dull colors where the dyes bleed together.
Check out some of these 17+ Tie Dye Patterns and Folding Techniques for some inspiration!
 Step 5. Let the dye set.
Once you have finished applying the dye, you need to give it time to react with the fabric. It’s important to keep the fabric damp and relatively warm. (The warmer the temperature of the fabric, the quicker the dye reaction.)
I recommend placing the dyed fabric in a plastic bag or wrap it in plastic wrap. Place the wrapped fabric in a sunny spot, and let the dye process for at least 6-8 hours. For the brightest colors, you can let the dye cure for up to 24 hours.
Step 6. Rinse, wash, and wear your garment.
One of the keys to getting the cleanest, brightest colors is the washing-out process. Take your time here!
First, leaving the rubber bands or ties on, rinse the garment under cold running water. Then, continue rinsing in cool/lukewarm water while you remove the rubber bands or ties. Keep rinsing until the water runs clear. Then, run the garments through a complete warm/hot washing machine cycle with detergent.
For this first wash, you can wash multiple garments together, as long as they have been dyed with similar colors. If you wash too many colors together in the same load, the garments can come out muddy looking.
For the next couple of loads, you’ll want to wash your tie-dyed clothing separately from the rest of your clothes. Then you can wash them with the rest of your colors.
 Tie-Dye Patterns and Folding Techniques
Here are a few of the various designs you can create with tie-dye:
- Scrunch or Nebula: Lay the shirt flat. Scrunch the fabric together, gathering it into a tight disk. Wrap several rubber bands around the disk. The tighter you scrunch it, the more white areas there will be in the final shirt.
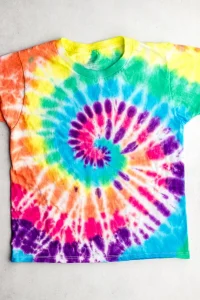
- Swirl: Pinch a small section in the center of the shirt. Hold on to that small section while you twist the shirt clockwise. Keep twisting, and the shirt should fold in on itself like a flat cinnamon roll. Secure the shirt with 3 or 4 rubber bands, crisscrossing them over the center of the disc. The tighter you bind the shirt, the more white there will be.
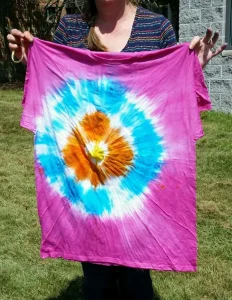
- Bullseye: Pinch a section of fabric at the center of the shirt. Pull the fabric up to a point, and smooth the rest of the fabric down to create a skinny cone shape. Wrap rubber bands around the cone of fabric – starting about an inch below the point of the cone. You can add as many or as few rubber bands as you want.
- Sunbursts: Lay the shirt flat. Pinch a series of small sections and pull them up to create small, skinny cone shapes. Secure each with a couple of rubber bands.
- Stripes: Lay the shirt flat. Starting from the bottom or one side, fold the shirt in a series of small accordion-style folds. Wrap the folded shirt with rubber bands every 1 to 2 inches.
- Square Box Folds: Fold the shirt lengthwise in a series of accordion folds, each section about 3-4 inches wide. Press each fold well to get sharp creases. Then, fold the shirt widthwise in a series of accordion folds, each 3-4 wide. Sandwich the fabric between two squares of cardboard. Secure well with rubber bands.
- Triangle Folds: This technique is very similar to the previous technique. In the second step, you’ll fold the strip of fabric into triangles instead of squares. Then, sandwich the fabric between two triangles of cardboard. Secure well with rubber bands.
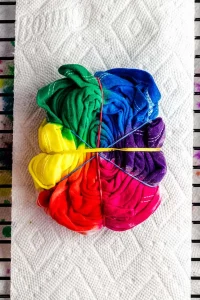
- Kaleidoscope or Mandalas: For this look, you’ll be creating a design with one or two lines of symmetry. Lay the shirt out on the table and fold it in half lengthwise and then again widthwise. After the shirt is folded in quarters, you can secure the shirt in whatever pattern you like.
- Ombre Dip-Dye: For this technique, you don’t have to fold the fabric. Simply dip one end of the shirt into a bucket of dye. As it sits in the dye bath, the dye will slowly work its way up the fabric. You can repeat this process by dipping the other end of the fabric into a different color of dye.
- Heart. First, fold the shirt in half lengthwise. Draw half a heart shape on the fold with a washable marker. Starting at one end of your line, make small accordion pleats. Follow the drawn line, making the pleats so that the line appears straight at the top of the folds. (You’ll be making the folds a little deeper on the outside section and a little shallower on the inside section to accommodate the curve of the line.) When all of the fabric has been pleated, secure it with a thick rubber band placed on the line itself. Then, you can add more rubber bands on the inside or outside sections as desired.
 Tie Dying Other Items
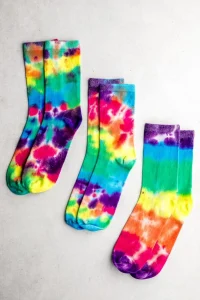
Don’t stop at shirts! There are all sorts of other garments and items you can tie-dye: hoodies, sweatpants, headbands, socks, and even sneakers. When you’re shopping, look for garments with a very high percentage of cotton or other natural fiber.